In a blender or food processor, combine the cottage cheese and egg. Blend until smooth and creamy, about 30 seconds. If you don’t have a blender, whisk vigorously by hand—small curds are fine.
Mix the dough.
Transfer the blended mixture to a large bowl. Add the flour, baking powder, and salt. Stir with a wooden spoon until a shaggy dough forms. Add cracked pepper and herbs if using.
Knead briefly.
Turn the dough out onto a lightly floured surface. Knead gently for 1–2 minutes until smooth and cohesive. If the dough is too sticky, sprinkle on a little more flour, 1 tablespoon at a time.
Portion and roll.
Divide the dough into 4 equal pieces. Roll each piece into a ball, then flatten with a rolling pin to about 1/8-inch (3 mm) thickness. Dust with flour as needed to prevent sticking.
Cook the flatbreads.
Heat a nonstick or cast-iron skillet over medium heat. Brush lightly with olive oil. Cook each flatbread for 2–3 minutes per side, until golden brown spots appear and the bread puffs slightly. Adjust heat to prevent burning.
Keep warm and serve.
Stack cooked flatbreads on a plate and cover with a clean kitchen towel while you cook the rest. Serve warm.
Serving Suggestions
Spread with hummus, sliced cucumber, tomato and feta.
Use as a base for personal pizzas or open-faced sandwiches.
Roll up with smoked salmon, cream cheese and herbs.
Serve alongside soups, stews or curries as a soft, absorbent bread.
Tips & Variations
Gluten-free: Substitute a 1:1 gluten-free baking flour blend.
Cheesy twist: Add ¼ cup grated Parmesan or cheddar to the dough.
Herb infusion: Mix in dried oregano, thyme or rosemary for extra flavor.
Make-ahead: Dough can be refrigerated, wrapped, for up to 24 hours. Let come to room temperature before rolling.
½ cup (about 2 oz) shredded mozzarella or additional cheddar
6 slices cooked bacon, chopped (reserve 6 slices for garnish)
For serving & optional toppings:
Shredded lettuce
Diced tomato
Pickle slices or chips
Ketchup & mustard
Optional burger sauce:
½ cup mayonnaise
2 Tbsp ketchup
1 Tbsp yellow mustard
1 tsp pickle relish
Pinch of paprika
Instructions
Preheat oven to 425°F (220°C). Generously spray the cone molds with cooking spray. Line up molds on a rimmed baking sheet.
Arrange tater tots in stacks inside each cone mold, starting at the bottom and working upward. Pack tightly so the tots form a solid “cone.” Bake 15–20 minutes, until golden brown and crisp. Rotate pan halfway through for even coloring.
Meanwhile, in a large skillet over medium heat, add ground beef, chopped onion and garlic. Cook, breaking up the meat, until beef is no longer pink and onions are soft, about 6–8 minutes. Drain excess fat.
Stir in Worcestershire sauce, Dijon mustard, salt and pepper. Cook 1 more minute. Remove from heat and stir in 1 cup cheddar cheese and chopped bacon. Set filling aside.
When tater cones are crisp, remove from oven and let cool 2–3 minutes. Carefully slide each cone out of its mold.
Using a small spoon, fill each tater tot cone with the cheeseburger mixture, pressing gently. Top each cone with the remaining ½ cup shredded cheese and reserved bacon slices.
Return stuffed cones to the baking sheet. Bake 5–7 minutes more, or until cheese is melted and bubbly. For extra browning, switch oven to broil on low and broil 1–2 minutes—watch closely!
While cones bake, whisk together burger sauce ingredients (if using) in a small bowl.
Remove cones from oven, let rest 2 minutes. Top with shredded lettuce, diced tomato, pickles and a drizzle of ketchup, mustard or burger sauce.
Notes
You can use silicone cone molds for easier release.
Prep the beef filling ahead and refrigerate up to 1 day.
Swap ground beef for turkey or plant-based crumbles if desired.
These fudgy red velvet brownies feature a creamy cheesecake swirl for an extra indulgent treat. Perfect for parties, gifts, or any time you crave something spectacularly chocolatey and tangy.
Yield
9 brownies (3×3 pan)
Prep & Bake Time
Prep Time: 15 minutes
Bake Time: 25–30 minutes
Total Time: 45 minutes
Ingredients
Brownie Layer
½ cup (115 g) unsalted butter, melted
1 cup (200 g) granulated sugar
2 large eggs, room temperature
1 teaspoon vanilla extract
1 tablespoon red food coloring
⅓ cup (35 g) unsweetened cocoa powder, sifted
½ teaspoon salt
1 cup (125 g) all-purpose flour, sifted
Cheesecake Swirl
8 oz (225 g) cream cheese, softened
¼ cup (50 g) granulated sugar
1 large egg yolk
½ teaspoon vanilla extract
Optional Decoration
White chocolate chips
Red velvet or white sprinkles
Instructions
Preheat oven to 350°F (175°C). Line a 8×8 inch (20×20 cm) square pan with parchment paper, leaving an overhang for easy removal. Grease lightly.
In a large bowl, whisk together melted butter and sugar until smooth. Add eggs one at a time, whisking after each addition. Stir in vanilla extract and red food coloring until evenly combined.
Sift cocoa powder and salt over the wet mixture. Gently fold in with a spatula. Add flour and stir just until no streaks of flour remain—do not overmix.
In a separate bowl, beat the softened cream cheese with sugar until creamy and smooth. Add egg yolk and vanilla, mixing until fully incorporated.
Pour half of the red velvet batter into the prepared pan, spreading evenly. Dollop spoonfuls of the cheesecake mixture over the batter. Pour remaining brownie batter on top. Using a knife, swirl through the batter in an “S” motion to create a marbled effect.
Optional: Sprinkle white chocolate chips or sprinkles over the top.
Bake for 25–30 minutes, or until edges are set and a toothpick inserted into the center comes out with a few moist crumbs. Avoid overbaking for fudgy brownies.
Allow brownies to cool completely in the pan on a wire rack. Use the parchment overhang to lift brownies out. Cut into 9 squares.
Tips & Variations
Room-temperature ingredients yield a smoother batter.
For extra richness, stir in ¼ cup white chocolate chips into the brownie batter.
Swap red food coloring for natural beet powder for a more wholesome twist.
Ensure cream cheese is very soft to prevent lumps in the swirl.
Storage
Store in an airtight container at room temperature for up to 3 days.
Refrigerate for up to 5 days; let come to room temperature before serving.
Freeze cut brownies in a single layer on a baking sheet, then transfer to a bag for up to 2 months. Thaw overnight in the fridge.
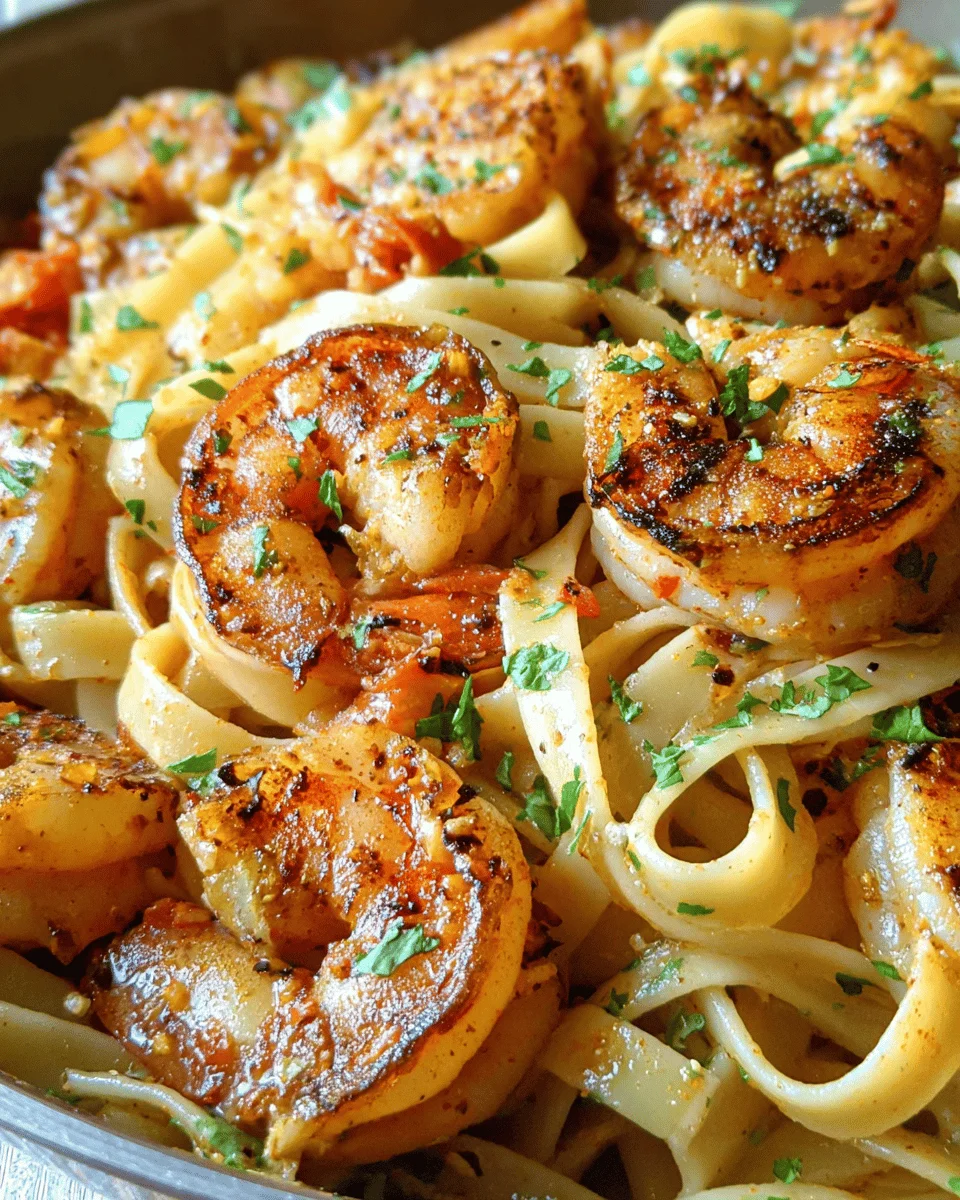
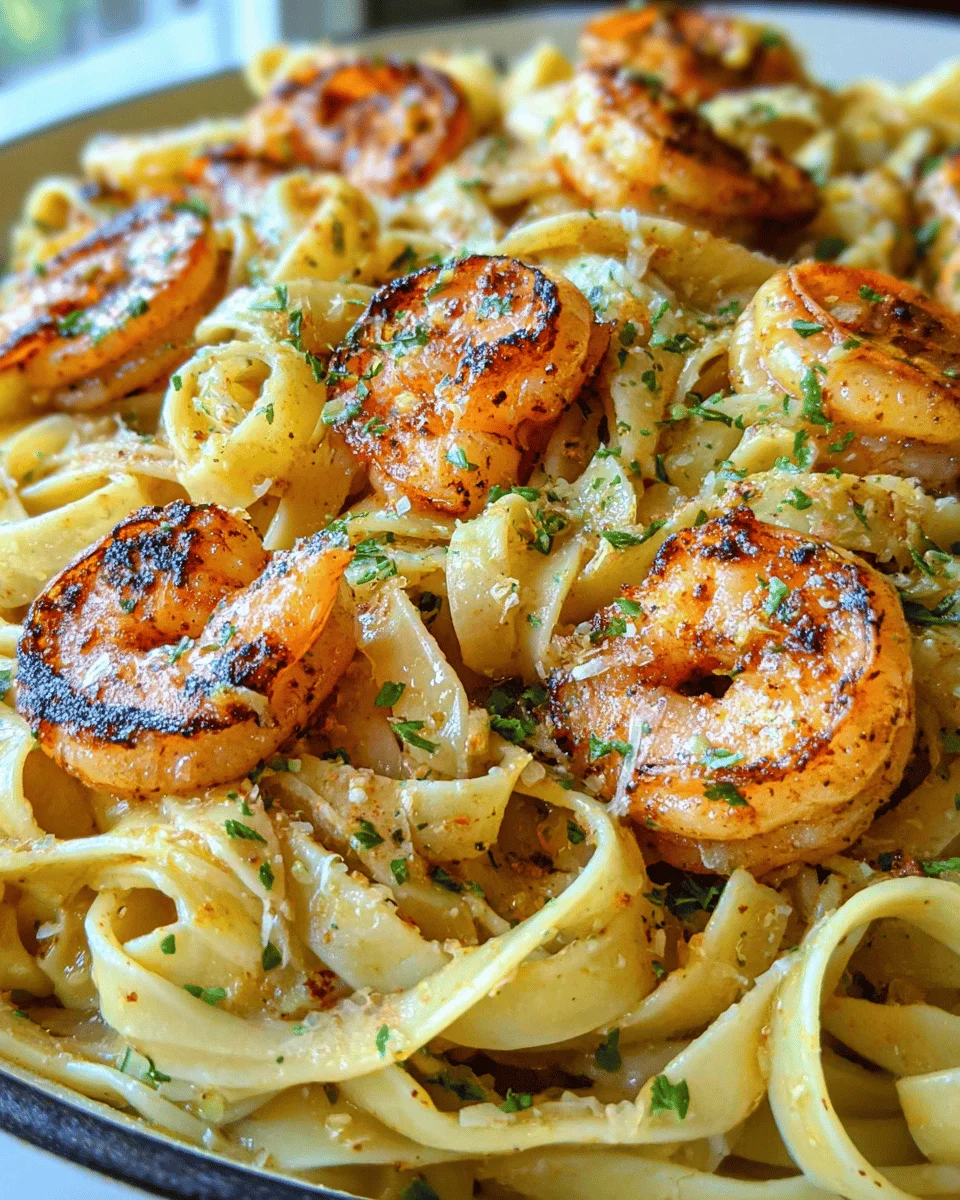
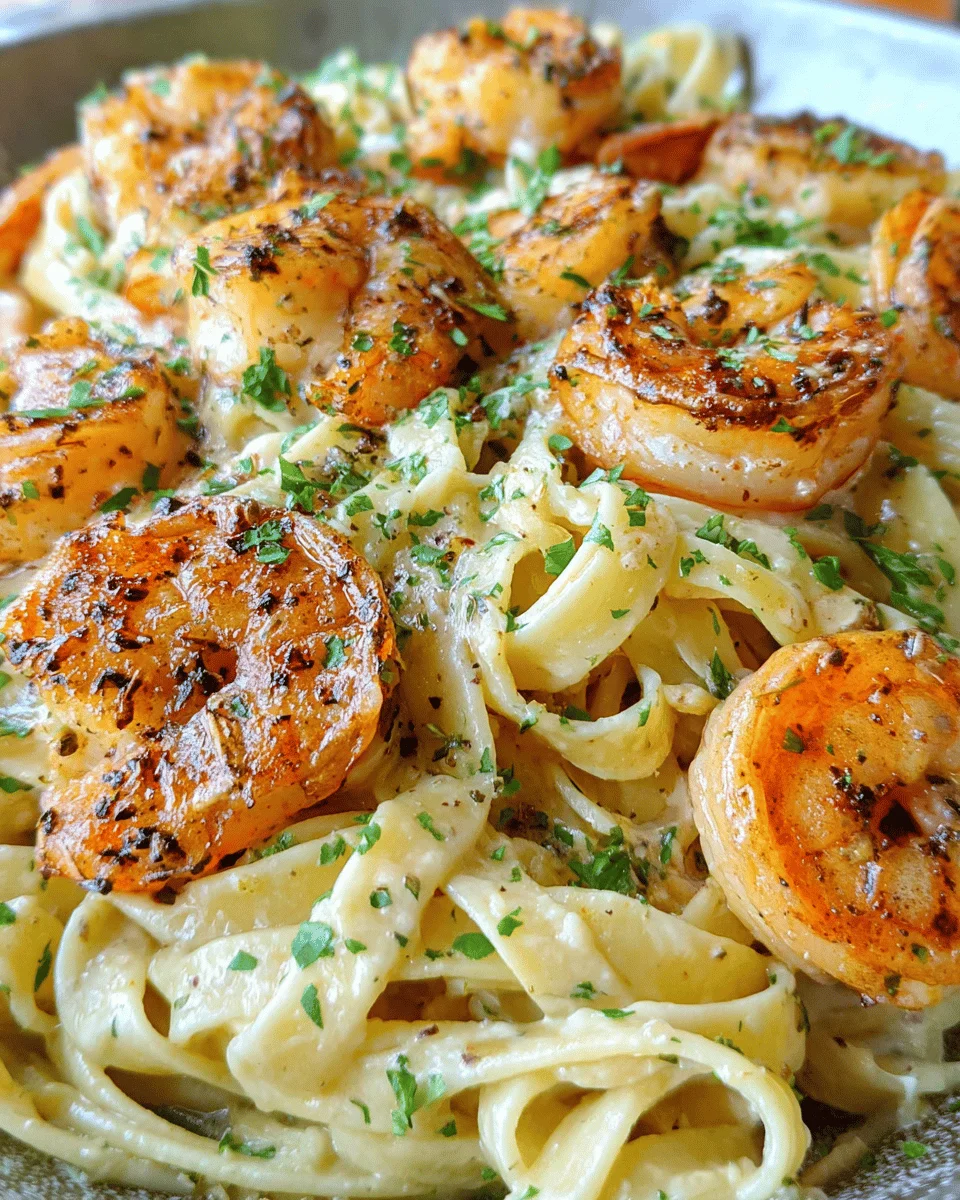
The Cajun Shrimp Pasta Recipe is a delightful dish that brings vibrant flavors to your dinner table. This creamy pasta combines perfectly seared shrimp with a seasoned sauce, making it a fantastic choice for family dinners or special occasions. Its balance of spice and creaminess will impress your guests while being easy enough for a weeknight meal. Let’s dive into this delicious recipe that’s sure to become a favorite!
Why You’ll Love This Recipe
Quick Preparation: With only 20 minutes of prep time, you can have this dish ready in under an hour, perfect for busy evenings.
Flavor Explosion: The Cajun seasoning provides a bold kick, elevating the flavor profile and keeping your taste buds dancing.
Versatile Dish: Suitable for various occasions, from casual family dinners to elegant gatherings; it fits right in.
Comfort Food Appeal: Creamy pasta paired with tender shrimp creates a warm and comforting meal that everyone will love.
Customizable Ingredients: Feel free to adjust the spices or add vegetables to suit your preference; it’s easily adaptable!
Tools and Preparation
To make this dish efficiently, having the right kitchen tools is essential. Here are some must-haves that will streamline your cooking process.
Essential Kitchen Tools
Large skillet
Pot for boiling pasta
Measuring cups and spoons
Wooden spoon or spatula
Serving plates
Why These Tools Matter
Large skillet: A spacious skillet allows you to cook the shrimp and shallots evenly without crowding.
Pot for boiling pasta: Ensures you can cook the fettuccine noodles properly while preparing the sauce simultaneously.
Measuring cups and spoons: Accurate measurements guarantee balanced flavors in your creamy sauce.
Wooden spoon or spatula: Ideal for stirring, ensuring all ingredients blend seamlessly.
Ingredients
This easy family-friendly fettuccine pasta combines pan-seared garlic shrimp with a creamy Cajun seasoned pasta sauce.
For the Pasta
12 ounces uncooked fettuccine noodles
For the Sauce and Shrimp
1 lb jumbo gulf shrimp (peeled and deveined)
2-3 tablespoons creole seasoning blend
2 tablespoons butter
2 shallots thinly sliced
3 cloves garlic minced
½ cup chicken broth
1¼ cups heavy cream
⅔ cup freshly grated Parmesan cheese
Chopped fresh parsley
How to Make Cajun Shrimp Pasta Recipe
Step 1: Cook the Noodles
Bring a large pot of salted water to a boil.
Add the fettuccine noodles and cook according to package instructions until al dente.
Drain well and set aside.
Step 2: Prepare the Shrimp
Pat the shrimp dry with paper towels.
Sprinkle 1½ tablespoons of creole seasoning evenly over the shrimp, turning halfway through for even coverage.
Step 3: Sauté Shallots and Shrimp
In a large skillet, melt butter over medium-high heat.
Add sliced shallots and cook for about 5 minutes until softened.
Add the seasoned shrimp to the skillet, cooking for 2-3 minutes while flipping halfway through until they turn pink.
In the last 30 seconds of cooking, add minced garlic and stir constantly until fragrant. If needed, plate some mixture aside before adding more shrimp.
Step 4: Create the Sauce
Pour chicken broth into the skillet, scraping up any brown bits from the bottom as it cooks down by half.
Lower heat and stir in heavy cream; simmer while stirring often until reduced by almost half.
Step 5: Combine Everything
Slowly whisk in Parmesan cheese until melted and smooth.
Adjust seasoning with more creole spice if desired.
Return shrimp and shallots to the pan along with cooked fettuccine noodles; toss everything together gently to coat well.
Step 6: Serve
Garnish with chopped fresh parsley before serving.
Plate up your Cajun shrimp pasta hot, ready to enjoy!
How to Serve Cajun Shrimp Pasta Recipe
Serving your Cajun Shrimp Pasta perfectly can enhance the dining experience for you and your family. With the right accompaniments and presentation, this dish can shine on any table.
Garnish with Fresh Herbs
Chopped Parsley: A sprinkle of chopped fresh parsley adds a pop of color and a burst of freshness.
Green Onions: Thinly sliced green onions can offer a mild onion flavor that complements the dish.
Pair with Bread
Garlic Bread: Serve warm garlic bread to soak up the creamy sauce, making each bite delightful.
Crusty French Baguette: This bread pairs well with the pasta for an added crunch and texture.
Complement with Salad
Caesar Salad: A classic Caesar salad can add a crisp contrast to the rich pasta.
Mixed Greens Salad: Tossed greens with a light vinaigrette provide a refreshing balance to the meal.
How to Perfect Cajun Shrimp Pasta Recipe
Perfecting your Cajun Shrimp Pasta can elevate its flavor and texture. Here are some tips to consider:
Use High-Quality Shrimp: Choosing fresh or properly frozen shrimp can significantly enhance the dish’s taste.
Adjust Spice Levels: Tailor the amount of creole seasoning to suit your heat preference for an enjoyable meal.
Don’t Overcook Pasta: Cooking pasta al dente ensures it maintains a nice texture that holds up in the sauce.
Let Sauce Thicken: Allowing the sauce to reduce properly creates a creamier consistency that clings beautifully to the pasta.
Best Side Dishes for Cajun Shrimp Pasta Recipe
To create a balanced meal, consider serving side dishes alongside your Cajun Shrimp Pasta. Here are some delicious options:
Steamed Broccoli: Lightly steamed broccoli adds vibrant color and nutrients without overpowering flavors.
Roasted Asparagus: Drizzle asparagus with olive oil, season, and roast until tender for an elegant touch.
Coleslaw: A crunchy coleslaw can offer a refreshing contrast and help cut through the richness of the pasta.
Corn on the Cob: Sweet corn complements the spice of the pasta nicely; grill or boil for best results.
Caprese Salad: Fresh mozzarella, tomatoes, and basil provide a refreshing Italian twist that pairs well.
Potato Wedges: Seasoned potato wedges baked until crispy make for a comforting side option.
Common Mistakes to Avoid
When making Cajun Shrimp Pasta, it’s easy to overlook some key steps. Here are common mistakes to watch out for:
Overcooking the shrimp: Shrimp cooks quickly; overcooking can make it tough. Cook just until pink and opaque.
Neglecting seasoning: Not using enough Creole seasoning can lead to bland pasta. Taste as you go and adjust seasoning levels.
Ignoring pasta water: Adding pasta water can help the sauce cling better. Reserve a cup before draining the noodles.
Crowding the pan: Cooking too many shrimp at once can steam them instead of sear them. Cook in batches for the best texture.
Skipping the aromatics: Garlic and shallots enhance flavor immensely. Don’t skip sautéing them before adding liquids.
Refrigerator Storage
Store in an airtight container for up to 3 days.
Allow the dish to cool completely before refrigerating.
Freezing Cajun Shrimp Pasta Recipe
Freeze in a freezer-safe container for up to 2 months.
It’s best to freeze without fresh parsley added.
Reheating Cajun Shrimp Pasta Recipe
Oven: Preheat to 350°F (175°C) and bake covered with foil until heated through, about 15-20 minutes.
Microwave: Heat in short intervals, stirring between each, until warmed evenly.
Stovetop: Warm gently over low heat, adding a splash of chicken broth if needed to loosen the sauce.
Frequently Asked Questions
How do you make Cajun shrimp pasta?
To make Cajun shrimp pasta, cook fettuccine noodles, sauté seasoned shrimp with shallots and garlic, then mix with a creamy sauce.
What can I substitute for shrimp in Cajun pasta?
You can use chicken or turkey pieces as a protein alternative in this recipe while following the same cooking instructions.
Can I customize this Cajun Shrimp Pasta Recipe?
Absolutely! Add veggies like bell peppers or spinach for extra nutrition and flavor.
How do you store leftovers of Cajun Shrimp Pasta?
Store leftovers in an airtight container in the refrigerator for up to 3 days.
Conclusion
This Cajun Shrimp Pasta Recipe is not only delicious but also versatile, allowing you to customize it with your favorite proteins and vegetables. Its creamy texture combined with bold flavors makes it a family favorite that’s perfect for any occasion. Try it today!