Saturday, October 18, 2025

A Delicious Way to Lose Weight The Best Homemade Drink for Fast Results

by


When I first tried this homemade fat-burning drink, I had no idea what a real impact it would have on my health and well-being.

This powerful drink, rich in natural ingredients, has become a daily ritual that helps me feel lighter, energized, and focused. It's so simple to make, but its benefits are anything but simple!

The best homemade drink for fast results
INGREDIENTS:


350 ml of water: Hydration is essential for overall health, as it aids digestion and the elimination of toxins.
1 to 2 tablespoons of apple cider vinegar (I use Bragg's with the "Mother"): Known to reduce appetite, aid digestion, and balance blood sugar, apple cider vinegar is a must-have ingredient for weight loss.
1 tablespoon of fresh lemon juice: Rich in vitamin C and antioxidants, lemon juice helps detoxify the body and boost metabolism.
1 teaspoon of cinnamon: Cinnamon is a powerful spice that can help stabilize blood sugar, making it easier to control cravings throughout the day.

1/2 teaspoon of sweetener (such as stevia or raw sugar): A touch of natural sweetness to balance the flavors without spiking blood sugar.


PREPARATION:
Blend: Pour all ingredients into a blender and blend for about 10 seconds, just enough to combine everything and obtain a smooth drink.
Drink immediately: It's best to enjoy this drink immediately after preparation to reap the maximum benefits.
Incorporate it into your routine: Try drinking it first thing in the morning or before meals to boost your metabolism.

How this drink changed my life: Not only did I notice a difference in my waistline, but I also felt more energetic and focused. This drink has become a staple of my day, and I look forward to that refreshing, tangy taste every morning. It was a small change, but with huge, life-changing results!

Secret Ingredient for the Crispiest Bacon

by

We don’t do “leftover” bacon in our house. Oh, it’s all gone in a flash of an eye! It is also an enormous hit with everyone in my family – my kids love it, my husband loves it, and quite honestly, so do I! Eggs and bacon are a classic for us, almost to the point where at this point it’s a tradition to eat it for breakfast. I like to let the bacon get as crispy as possible because, let’s be honest, crispy bacon is delicious, and I don’t get disappointed faces from my kids when one of them gets the crispier one than the other. But sometimes it doesn’t come out quite as crispy as I’d like. It’s still good, of course, but if you’re a bacon lover like me, the crunchiness is just everything.

source: Flickr

Then, I was informed of this secret for achieving the crunchiest bacon, and let me tell you, this is the way to cook bacon. And it does take some flour, and a lot of time, but the results are, of course, worthwhile. This is something life-altering I wanted to tell you. And honestly, it will make your whole family appreciate you more when you cook them this. I SWEAR!

The Flour Method for Bacon that Isn’t Chewy

So, here’s the secret: flour! The key to the best crispy bacon every time: Just add a bit of flour to your bacon and refrigerate for 30 minutes before you start cooking. But why flour, you may ask? Okay, first things first: The flour serves to soak up some of the excess fat of the bacon so that it can crisp faster. Helps the bacon to also not curl as tight, you will get nice straight bacon.

source: Flickr

Can You Use Other Flours?

Yes, you can! It’s best to stick with all-purpose flour, although it may be fun to experiment with other flours, like rice flour or cornstarch. My sister-in-law uses gluten free flour and as she told me, it works just fine. Honestly, just use any type of flour that will absorb moisture – so it can create a crispy coating.

How to Make the Crispiest Bacon: Step-by-Step

Below is the process on how to make the crispiest bacon of your life. It is very easy, but you should prepare for it beforehand, which I know we don’t always have time for. But trust me, my kids and my husband, it’s worth it! Ha!

Ingredients:

  • Bacon strips (2–3 per person)
  • All-purpose flour (or your preferred type of flour)
  • Parchment paper
  • Beeswax wrap or an additional piece of parchment paper

Instructions:

The Night Before:

  1. Grab a medium-sized bowl and put some flour in it.
  2. Take each bacon strip and dip it into the flour, ensuring it is well coated. Shake off the excess flour.
  3. Place the flour-coated bacon strips on a parchment paper-lined sheet pan so that the bacon pieces are not touching. Or get your kids to do it. Mine like to help me in the kitchen sometimes. If you need to layer the bacon, put a sheet of parchment paper between each layer.
  4. Cover the pan with beeswax wrap or an additional layer of parchment paper.
  5. Put the pan into the fridge and chill the bacon for a few hours, or overnight.

The Morning Of:


  1. Preheat your oven to 400°F.
  2. Take the bacon out of the fridge and put them in a single layer on a parchment paper on a baking pan.
  3. Cook it in the preheated oven for about 5 minutes.
  4. Using tongs, flip the bacon slices over. Bake for an another 5 minutes, or until the bacon is crispy and evenly browned.
  5. Once the bacon is golden brown and super duper crispy, use the tongs to put it to a paper-towel-lined plate to soak up the excess oil.
  6. Serve the bacon warm and don’t let your kids and husband eat ALL of it! You’ve definitely earned it too, since you’ve started preparing it the day before.

Why the Shape Matters

One of the best things about this method, however, is that it helps bacon maintain its shape. It’s important to have bacon strips rather than crumbled bacon bits on hand at all times, because you never know when you might want to quickly fry up some bean-and-egg tacos or a BLT. Not only do the strips look and taste better, but they make it easy to turn any bite crispy and crunchy. And my kids started asking me to give them ‘the straightest bacon’ I’ve made and it cracks me up. Haha!

This hack is certain to earn you the title of breakfast hero in your family. It’s tempting to figure you can skip the step of coating the bacon in flour (and chilling the stuff, in the refrigerator, overnight), but you can’t. I hope this is helpful the next time you’re planning on making a huge breakfast or brunch! You will be surprised at how crunchy and flavorful the bacon will turn out.


This has been our go-to way for cooking bacon. It’s a basic but great way to start your day off right and the moment you bite into your first piece of bacon you’ll get why. Also, it’s fun to get the kids involved with the preparation, having them shake the bacon in the flour and lay it out on the pan.

Heaven on Earth Cake Recipe

by


Ingredients:
1 package angel food cake mix (or 1 prepared angel food cake)
1 package (3.4 oz) instant vanilla pudding mix
1 ½ cups milk
1 cup sour cream
1 package (8 oz) cream cheese, softened
½ cup powdered sugar
1 can (21 oz) cherry pie filling
1 tub (8 oz) whipped topping, thawed
Almond slices for garnish (optional)
Instructions:


Directions:

Prepare the Cake: Bake the angel food cake according to package directions (or use a store-bought one). Let it cool completely.
Make the Pudding: In a medium bowl, whisk the vanilla pudding mix with milk until thickened.
Prepare the Cream Filling: In another bowl, beat the sour cream, softened cream cheese, and powdered sugar until smooth. Gently fold in the pudding mixture.
Assemble the Layers:
Cut the cooled cake into small cubes. Place half in a large serving dish or trifle bowl.
Spread half of the cream mixture over the cake.
Top with half of the cherry pie filling.
Repeat the layers with remaining cake, cream, and cherry filling.
Finish & Chill: Spread whipped topping over the top. Garnish with almond slices if desired. Refrigerate for at least 4 hours (or overnight) before serving.
Prep Time: 20 mins | Chill Time: 4 hrs | Total Time: 4 hrs 20 mins
Calories: 380 kcal | Servings: 10

Enjoy this heavenly, creamy, and fruity dessert chilled!

AVERTISSEMENT COVID-19 : Alerte mondiale pour les personnes vaccinées : cela leur arrivera également.

by


Dr. Glenn Good, an epidemiologist at the University of California, San Francisco, was one of the first to study the long-term effects of COVID-19. Since 2021, he has been publishing, teaching, and researching this complex phenomenon, which persists in some patients long after the initial infection.

But three years later, he is no longer just a researcher, but also a patient.

Even driving is disgusting. I constantly have to choose between working, going out, or even doing laundry.


For this expert, the illness has become an invisible prison: fewer precious hours in the day, more room for surprises.


Chronic COVID-19 disease can manifest itself in many ways, but the most common symptom is chronic fatigue. Extreme fatigue that goes beyond simple weakness. Dr. Cohen describes it as profound exhaustion... even after a restful night's sleep.

Added to this are dizziness, persistent disorientation, memory or speech problems… every task becomes a challenge.

According to a Yale University study, about half of people with long-term COVID-19 also meet the criteria for chronic fatigue syndrome, a poorly understood and often underestimated condition.

Consequences for social and professional life

Long COVID not only affects health, but also careers, social relationships, and emotional well-being. Dr. Cohen, like one in ten affected individuals in the United States, has had to drastically limit his work activities.

Many patients struggle with income loss, medical bills, and loneliness. Some have to choose between paying the rent and seeing a doctor.

Meanwhile, scientific research is stagnating, hampered by increasing public disinterest and declining funding.

Contrary to popular belief, the effects of COVID-19 disease don't just stay in the mind. They leave lasting marks on the body:

Pulmonary fibrosis, which causes breathing problems.

Chronic carditis

POTS (postural orthostatic tachycardia), in which the heart beats faster with the slightest change in position.

And above all, a weakened immune system, which makes frequent infections much more risky.

Dr. Cohen emphasizes: "It's not laziness. It's not psychosomatic. It's a true multisystem disease that is still poorly understood."

Hope? There's a hint, but no cure yet.

DIY Toilet Bombs: Keep Your Bathroom Fresh and Spotless All Week Long

by


Introduction:

Maintaining a fresh and spotless toilet can feel like a daily chore, especially in busy households. While commercial cleaners do the job, they’re often packed with harsh chemicals and artificial scents. That’s why even professional housekeepers are turning to natural, homemade toilet bombs for a powerful, long-lasting clean. In this article, you’ll learn how to create your own eco-friendly, effective toilet fresheners that keep your bathroom smelling clean and looking pristine for up to a week—with minimal effort.

Ingredients:

1 cup baking soda (cleans and deodorizes)

¼ cup citric acid (helps fizz and break down stains)

1 tablespoon hydrogen peroxide (disinfectant)

15–20 drops essential oil (lavender, eucalyptus, lemon, or tea tree)

Optional: 1 teaspoon vinegar (adds extra fizzing power)

Silicone mold or small ice cube tray (for shaping)

Gloves (recommended for mixing)

Instructions:

Mix dry ingredients: In a mixing bowl, combine baking soda and citric acid. Stir well to remove clumps.

Add essential oil: Slowly add the essential oil of your choice, mixing constantly to distribute the fragrance evenly.

Add hydrogen peroxide: Gradually pour in hydrogen peroxide. It may fizz slightly. Mix thoroughly until it has a slightly damp, sand-like consistency. If needed, add a tiny bit of vinegar to help bind the mixture—but don’t overdo it, or it will fizz prematurely.

Mold the mixture: Pack the mixture tightly into a silicone mold or ice cube tray.

Dry and cure: Let the bombs dry in the mold for at least 6–8 hours (or overnight) until they’re firm.

Store properly: Once dry, pop them out and store in an airtight container in a cool, dry place.

Serving and Storage Tips:

Usage: Drop one toilet bomb into the bowl every night before bed or every other day, depending on traffic.

Storage: Keep them in a sealed jar or container away from moisture to avoid premature activation.

Bonus tip: Add a decorative label and gift them to friends or neighbors for a thoughtful, eco-conscious present!

Variations:

Deep Cleaning Version: Add 1 tablespoon of borax for stronger stain removal.

Colorful Option: Mix in a pinch of natural food coloring for visual flair.

Extra Freshness: Add dried lemon zest or dried mint leaves for enhanced fragrance.

Sensitive Skin-Friendly: Use hypoallergenic essential oils like chamomile or calendula.

FAQ:


Q: How often should I use these toilet bombs?
A: For best results, use one every 1–2 days to maintain freshness and reduce buildup.

Q: Can I use them in a septic system?
A: Yes! These natural ingredients are septic-safe and won’t harm your plumbing.

Q: Are they safe for children and pets?
A: While the ingredients are generally non-toxic, always store out of reach of children and pets to avoid ingestion.

Q: What if I don’t have citric acid?
A: You can substitute with lemon juice, but you’ll need to adjust the dry ingredients to maintain the right consistency.

Q: Can I use them for cleaning or just deodorizing?
A: They do both! The fizzing action helps loosen grime, while the baking soda and essential oils neutralize odors.

How did I not know about this? Learned something new!

by


Growing up, my Nana had the most immaculate lawn in the neighborhood. Every blade of grass seemed to stand at attention, lush and vibrant green. It was the kind of lawn that made you want to kick off your shoes and run barefoot across it.
What always struck me, though, was that she never seemed to spend hours toiling away in the yard like other homeowners. There was a secret, a trick she passed down to me that I now use in my own yard. It’s a simple, almost effortless method to get rid of those ugly brown patches that can mar an otherwise perfect lawn. Here’s how it works.Organic lemon products

Understanding the Enemy: Why Brown Patches Form
Before diving into the remedy, it’s essential to understand why these unsightly brown patches appear in the first place. Brown patches in lawns are often the result of several factors, including:
Drought Stress: During hot, dry weather, grass can become dehydrated, leading to brown, crispy patches.
Fungal Diseases: Certain fungi thrive in warm, humid conditions and can cause large brown patches to appear almost overnight.
Pest Damage: Grubs, chinch bugs, and other lawn pests can feed on the roots of the grass, leading to dead spots.
Pet Urine: Dog urine, which is high in nitrogen, can burn grass and leave behind brown patches.
Once you identify the likely cause of the brown patches in your lawn, you can address the issue effectively. However, my Nana’s trick works wonders regardless of the specific cause.
Nana’s Magic Formula: The Secret Weapon
The trick Nana taught me isn’t about pouring chemicals onto your lawn or spending hours reseeding and watering. It’s about a natural, easy-to-apply mixture that you can make with ingredients you probably already have at home. Here’s what you need:
Epsom Salt: Epsom salt is rich in magnesium, which is essential for the production of chlorophyll. It helps grass stay green and healthy.
Mild Dish Soap: A few drops of dish soap can break the surface tension of the soil, allowing the nutrients to penetrate more effectively. It also helps the solution adhere to the grass blades and soil.
Water: The final and most crucial ingredient.
How to Apply the Solution


In a large bucket or watering can, mix 2 tablespoons of Epsom salt with 2 gallons of water.
Add a few drops of mild dish soap (make sure it’s free of harsh chemicals that could harm your lawn).
Spot Treat the Brown Patches:
Pour the mixture directly onto the brown patches. Make sure the area is thoroughly soaked but not waterlogged.
Water Regularly:
Over the next few days, water the treated area lightly but consistently. The Epsom salt will help revive the grass by providing essential nutrients, while the dish soap ensures even distribution.
Monitor and Repeat if Necessary:
After a week or two, you should notice the brown patches beginning to green up. If the patches are stubborn, reapply the mixture after two weeks.
Why This Works So Well
Epsom salt is a gentle and natural way to enhance the health of your lawn. The magnesium in Epsom salt helps grass absorb essential nutrients like nitrogen and phosphorus, which are vital for growth and greenness. Unlike harsh chemical fertilizers, Epsom salt won’t burn your grass or harm the environment. The dish soap acts as a wetting agent, ensuring that the solution penetrates deep into the soil where it can do the most good.
This method is incredibly effective because it targets the root cause of the brown patches without overwhelming your lawn with chemicals or requiring extensive labor. It’s a quick and easy fix that works gradually to restore the health and beauty of your lawn.
Prevention: Keeping Brown Patches at Bay
While Nana’s trick is fantastic for fixing brown patches, preventing them from occurring in the first place is always the best approach. Here are a few tips to maintain a healthy lawn:
Water Deeply but Infrequently:
Water your lawn early in the morning for about 20 minutes, two to three times a week. This encourages deep root growth, making your grass more drought-resistant.
Mow High:
Keep your mower blade at its highest setting. Taller grass shades the soil, reduces evaporation, and helps prevent weeds.
Fertilize Wisely:
Use a balanced fertilizer in the spring and fall. Avoid over-fertilizing, as too much nitrogen can cause brown patches.
Aerate the Soil:
Aerate your lawn once a year to prevent soil compaction and allow nutrients and water to reach the roots more effectively.
Control Lawn Pests:
Regularly check for signs of pests and treat your lawn as necessary to keep it healthy.Lemon zest products

Conclusion: A Lawn to Be Proud Of
Thanks to my Nana’s simple yet effective trick, I’ve been able to keep my lawn looking green and healthy without spending hours in the yard. Brown patches are no longer a concern because I know I have a reliable, natural remedy at my disposal. Whether you’re dealing with drought stress, pest damage, or just a few stubborn brown spots, this easy solution can help you restore your lawn to its former glory with minimal effort. So, the next time you see those ugly brown patches, reach for the Epsom salt and dish soap—you’ll be amazed at how well it works

Natural Solutions for Brighter Whites: Eco-Friendly Laundry Tips

by


Keeping Your Laundry White and Bright Naturally

When washing clothes, the use of mild detergents to achieve clean and bright whites is environmentally desirable as well as improving durability and quality of the clothes. Many traditional laundry whiteners contain chemicals which can be harmful or have negative effects on the environment. However, there are several natural alternatives that will effectively make your laundry white without affecting the fabric or being detrimental to earth.

Baking Soda: A Good Natural Whitener

A highly versatile household product with cleaning and deodorizing capabilities, baking soda, also known as sodium bicarbonate, is an effective natural bleach for white garments. To use baking soda for natural bleaching purposes, mix about 1/2 cup with your regular detergent. This helps soften water dissolving dirt and stains in clothing making the white apparels look fresher and brighter as a result.


Vinegar: A Natural Fabric Softener and Whitener

White vinegar is yet another good alternative in natural form for maintaining the brightness of white fabrics. It acts as a natural fabric conditioner, whilst removing residues from detergents that make clothes look dull over time. Add about 1/2 cup of white vinegar to your regular laundry detergent during the rinse cycle.. As a result, most of soap scum and mineral deposits will be removed from textile fibres making them smooth and shinning.

Hydrogen Peroxide: Safe and Effective Whitening Agent

Hydrogen peroxide is a mild bleaching agent that effectively whitens white clothes without the harmful effects associated with chlorine bleach. By releasing oxygen upon contact with stains, it breaks them up to lift them away from the cloth material. To use hydrogen peroxide pour about half cup into your washing machine’s detergent container. One should ensure proper dilution and avoid using too much as higher concentrations could potentially weaken fibers over time.

Lemon Juice: Freshness from Nature and Whiteness

Lemon juice is a kitchen necessity that doubles as a natural bleach to whiten white clothes. Citric acid found in lemon acts as a natural bleaching agent, removing stains on surfaces made of fabric and brightening fabrics. You can use lemon juice by putting half a cup into your washing machine’s detergent compartment with your regular detergent. Moreover, the laundry will acquire fresh citrus aroma thereby making your clothes smell clean again.

Sunlight: A Natural Brightener

Harnessing sunshine is one of the oldest and best methods of whitening and brightening garments naturally. Sunlight contains ultraviolet rays that help bleach fabrics naturally. After cleaning your white attires, hang them outside in direct sunlight to dry off. The light of the sun will then act as an effective bleach for any leftover stains or odours on your suit, giving it a fresh and well laundered appearance. However, you should be careful not to soak them for too long in the sun since excessive exposure leads to color fade over time.

Instructions:

Percarbonate: a Safe Bleach Substitute

Sodium percarbonate, commonly known as Percarbonate, is a solid substance that when mixed with water releases hydrogen peroxide. It is a very strong but environmentally friendly substitute for chlorine bleach in the whitening of clothes. Mix one to two tablespoons of sodium percarbonate in warm water and soak your white clothes before washing them normally. This will enable you to clear stains and brighten fabrics without using chlorine bleach which is harmful


Maintaining Whites – A Few Tips:

Separating whites: To retain their brightness and avoid color transfer, wash white garments separately from those colored.

Stain Pretreatment: For stubborn stains, pre-treat with a natural stain remover like baking soda paste or vinegar plus water solution prior to washing.

Don’t Overload: When it comes to filling the washing machine properly do not overload as it may make them dull soiled instead of clean. Always check your manufacturer’s instructions on load size.

Detergent Choice: Opt for either an all-purpose detergent that contains optical brighteners or one explicitly marked for “whites” to improve the whiteness effect noticeably.

Maintaining your Routine Cleanliness: Regularly clean your washer as this prevents mineral buildup and soap scum which can impact the cleanliness and brightness of clothing.

Incorporate these natural techniques into your laundry practice to achieve clean, white clothes that are friendly to the environment and fabrics. If you prefer baking soda, vinegar, hydrogen peroxide, lemon juice, sun or percarbonate, these natural options will help in maintaining a whiter and brighter fabric while promoting a healthier home space.

If your neck is starting to sag, don’t ignore it. This is why it happens. Full article

by


When we grow older, our bodies undergo a myriad of changes, some more noticeable than others. One such change is the sagging of the neck. This phenomenon, sometimes referred to as ‘turkey neck,’ can be distressing for many because of the fact that it is a visible sign of aging that can impact one’s self-esteem and confidence.

Understanding why the neck begins to sag and what can be done about it is very important for individuals looking to maintain a youthful appearance. In today article, explore the various factors that contribute to neck sagging and discuss potential solutions to address this common concern.

1. Understanding the Anatomy of the Neck

The neck is a complex structure composed of muscles, skin, and connective tissues. The platysma muscle, a thin layer of muscle extending from the chest to the jaw, plays an important part in neck appearance. When we age, the platysma can become lax, contributing to sagging. In addition, the skin on the neck is thinner than on other parts of the body, making it more susceptible to the effects of aging and environmental damage.

Collagen and elastin, two proteins found in the skin, provide structure and elasticity. Over time, the production of these proteins decreases, causing a loss of firmness and elasticity in the neck area. This anatomical understanding is crucial for addressing the root causes of neck sagging.

2. The Role of Aging in Neck Sagging

see continuation on next page


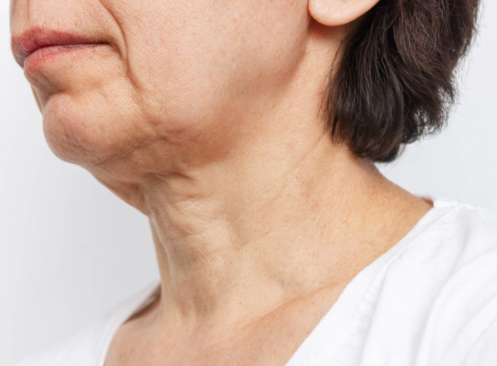
Aging is among the primary factors contributing to neck sagging. As we age, the skin loses its ability to retain moisture, and the production of elastin and collagen decreases. This leads to a loss of skin elasticity and firmness. When we turn 40, collagen production can decrease by about 1% per year, leading to noticeable changes in skin texture and tone.

Additionally, the natural aging process causes the fat pads in the neck to shift and diminish, leading to a hollow and sagging appearance. The cumulative effect of these changes is a neck that seems less firm and more wrinkled over time.

3. Impact of Sun Exposure on Skin Elasticity

Sun exposure is a significant contributor to skin aging, including the neck area. Ultraviolet (UV) rays from the sun penetrate the skin and cause damage to collagen and elastin fibers, accelerating the aging process. This damage is often referred to as photoaging.

According to studies, up to 80% of visible aging signs, such as wrinkles and sagging, can be attributed to sun exposure. Protecting the neck from UV rays by using sunscreen with a high SPF, wearing protective clothing, and seeking shade can help mitigate these effects and preserve skin elasticity.

4. How Genetics Influence Neck Skin

Genetics play an essential role in determining how and when the skin will age. Some individuals may be genetically predisposed to experience sagging skin earlier than others. Genetic factors can influence the rate at which collagen and elastin are produced, and how the skin responds to environmental stressors.


Though we cannot change our genetic makeup, understanding one’s genetic predisposition can help in taking proactive measures to delay the onset of neck sagging. This may include adopting a comprehensive skincare routine and making lifestyle changes to support skin health.

5. The Effect of Weight Fluctuations

Weight fluctuations can have significantly affect the skin’s appearance, particularly in the neck area. Rapid weight loss can lead to a loss of volume and elasticity in the skin, resulting in sagging. Conversely, weight gain can stretch the skin, and if the weight is lost again, the skin may not return to its original firmness.

Maintaining a stable weight through a balanced diet and regular exercise can help minimize the risk of neck sagging because of weight fluctuations. In addition, gradual weight loss is recommended to give the skin time to adjust and maintain its elasticity.

6. Importance of Hydration for Skin Health

Hydration is crucial for maintaining healthy, elastic skin. As the body is well-hydrated, the skin is more likely to retain its moisture and elasticity, reducing the appearance of sagging. Drinking adequate amounts of water, typically around 8-10 glasses per day, can help support skin health.

Apart from internal hydration, using moisturizers and hydrating serums can help maintain the skin’s moisture barrier. Ingredients such as hyaluronic acid and glycerin are particularly effective in drawing moisture into the skin and keeping it plump and firm.

7. Popular Viral Hacks for Firming the Neck

In recent years, social media has popularized a variety of hacks and DIY remedies for firming the neck. These include homemade masks, facial yoga exercises, and the use of tools like jade rollers and gua sha stones. While some of these methods may offer temporary improvements, their long-term efficacy is often debated.

It’s crucial to approach viral hacks with caution and to consider evidence-based treatments for more reliable results. Consulting with a dermatologist or skincare professional can provide guidance on the most effective methods for firming the neck.

8. The Benefits of Neck Exercises

Neck exercises can help strengthen the muscles in the neck and improve its appearance. Exercises such as chin tucks, neck stretches, and resistance training can help tone the platysma muscle and reduce the appearance of sagging.

Incorporating neck exercises into a regular fitness routine can provide gradual improvements in neck firmness. Consistency is key, and results may take several weeks to become noticeable. As with any exercise regimen, it’s important to perform exercises correctly to avoid strain or injury.

9. Skincare Products That Target Neck Sagging

There are various skincare products designed specifically to address neck sagging. These products often contain ingredients like retinoids, peptides, and antioxidants, which help stimulate collagen production and improve skin elasticity.


When you select a neck cream or serum, look for products with clinically proven ingredients and formulations. Regular application, combined with a comprehensive skincare routine, can help improve the appearance of the neck over time.

10. Professional Treatments and Procedures

For people seeking more immediate and dramatic results, professional treatments and procedures are available. Options such as laser therapy, radiofrequency treatments, and ultrasound therapy can help tighten the skin and stimulate collagen production.

Surgical options, such as neck lifts, provide the most significant improvements but come with higher costs and longer recovery times. Consulting with a board-certified dermatologist or plastic surgeon can help determine the most appropriate treatment based on individual needs and goals.

11. Lifestyle Changes to Prevent Further Sagging

Adopting a healthy lifestyle can play a significant role in preventing further neck sagging. This includes maintaining a balanced diet rich in antioxidants, vitamins, and minerals to support skin health. Foods high in vitamin C, E, and omega-3 fatty acids are particularly beneficial.

Adequate sleep, regular exercise, and stress management are also important for overall skin health. Avoiding smoking and excessive alcohol consumption can further protect the skin from premature aging. By making these lifestyle changes, individuals can help preserve the firmness and elasticity of their neck skin for years to come.